CentOS7系统下搭建pterodactyl翼龙游戏面板详细教程
写在开头
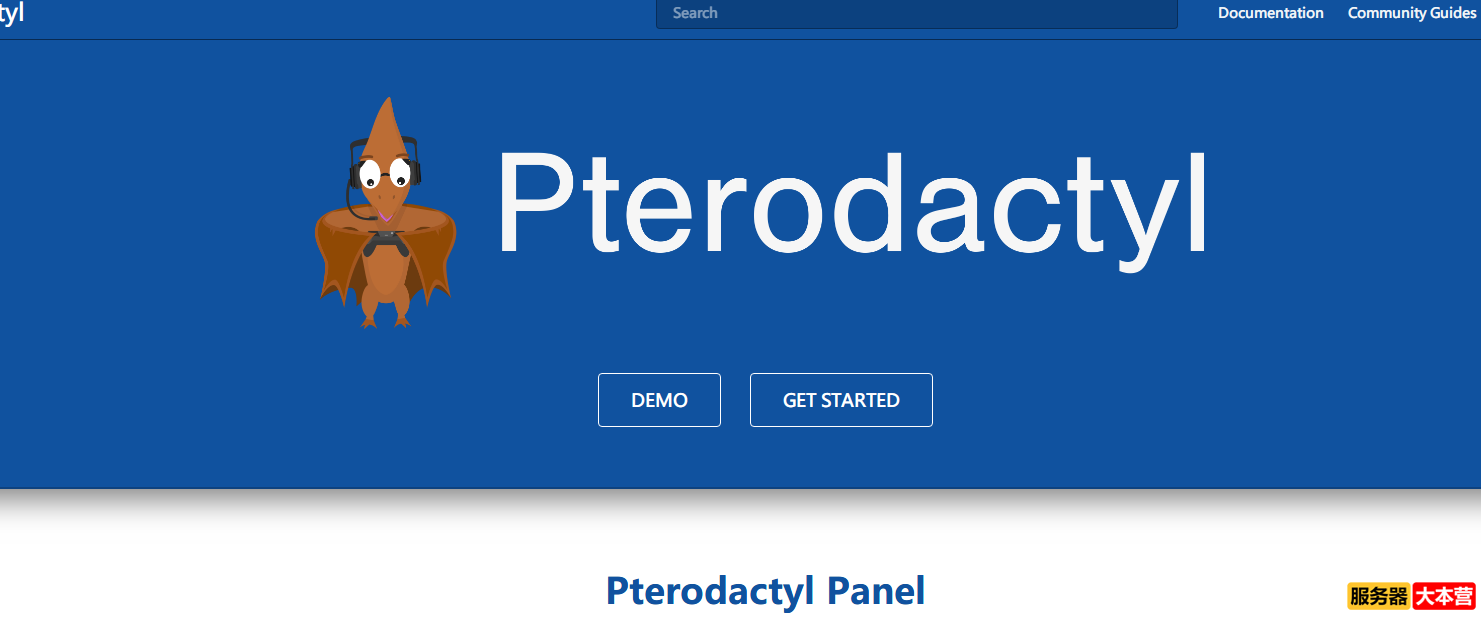
翼龙面板,英文全名Pterodactyl,译为“翼龙”,以下文章均简称为翼龙面板。
翼龙面板是使用PHP7、Nodejs和Go构建的开源游戏服务器管理面板。在设计时考虑到安全性,在隔离的Docker容器中运行所有游戏服务器,同时向管理员和用户提供美观直观的UI。同时提供API和WHMCS接口,管理员可以轻松的对接各类销售系统,以实现自动开通或者另外的管理功能。
官方网站
官网首页:https://pterodactyl.io/
官方安装教程:https://pterodactyl.io/project/introduction.html
本篇文章将依据官方安装教程,分别安装前端和后端,从Azure后台创建服务器开始,全面详解面板的安装。
创建服务器
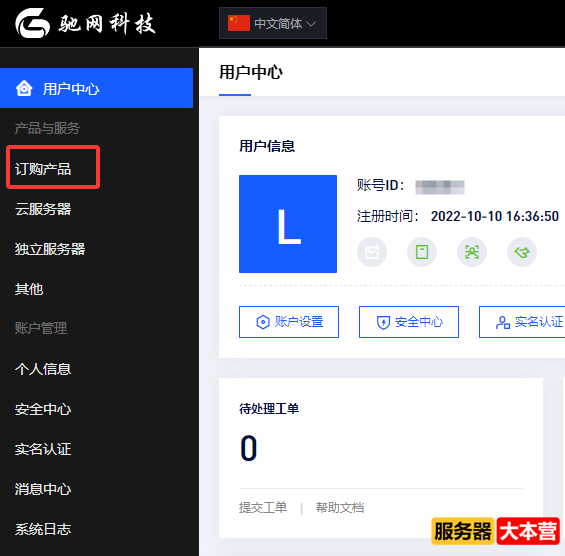
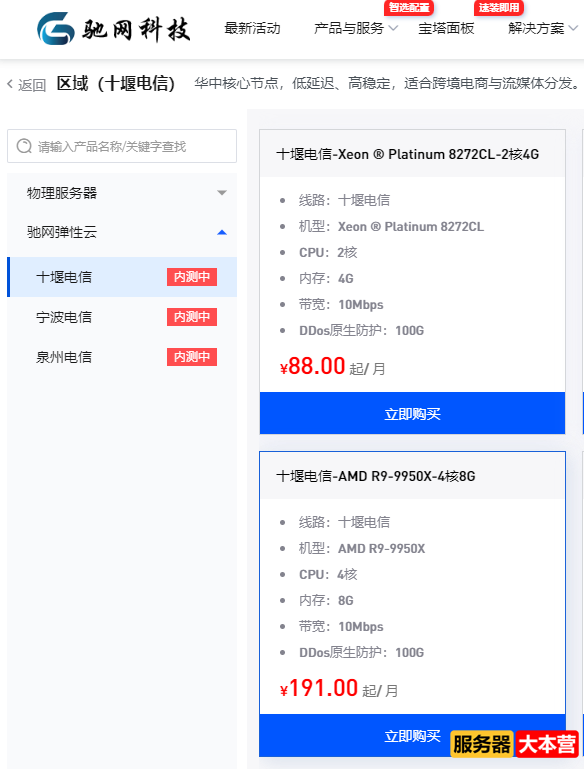
进入驰网控制面板,在左侧功能栏中单击“订购产品”,跳转驰网产品页后,找到“驰网弹性云”,选择合适的服务器配置和系统(本教程演示的是CentOS 7.6)下单开通云服务器实例。
CentOS7系统下搭建pterodactyl翼龙游戏面板详细教程
CentOS7系统下搭建pterodactyl翼龙游戏面板详细教程
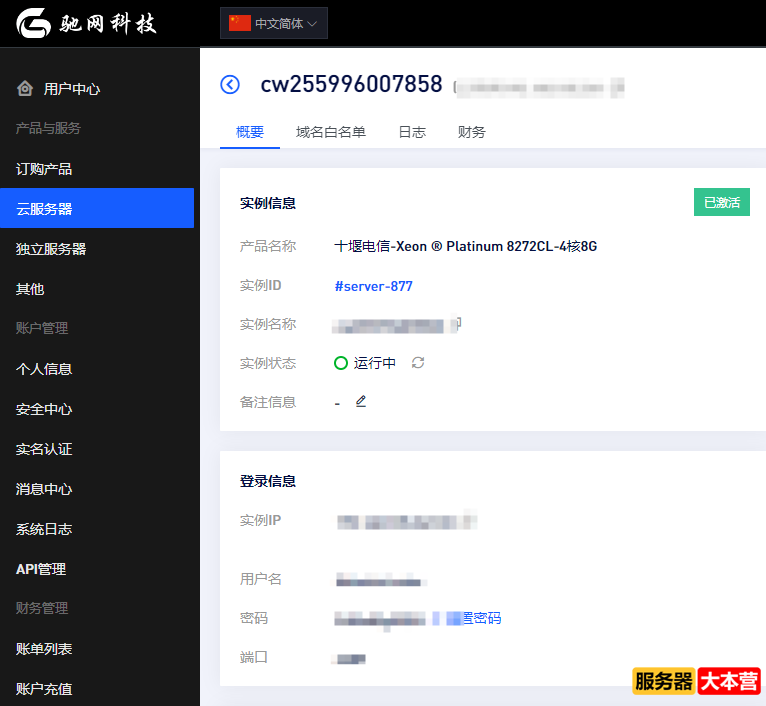
实例开通后会生成实例IP、用户名和密码,控制台都能看到,整理记下我们需要用到这些远程连接服务器,服务器游戏端口默认全开,备案域名需要在后台添加域名过白使用
CentOS7系统下搭建pterodactyl翼龙游戏面板详细教程
CentOS7系统下搭建pterodactyl翼龙游戏面板详细教程
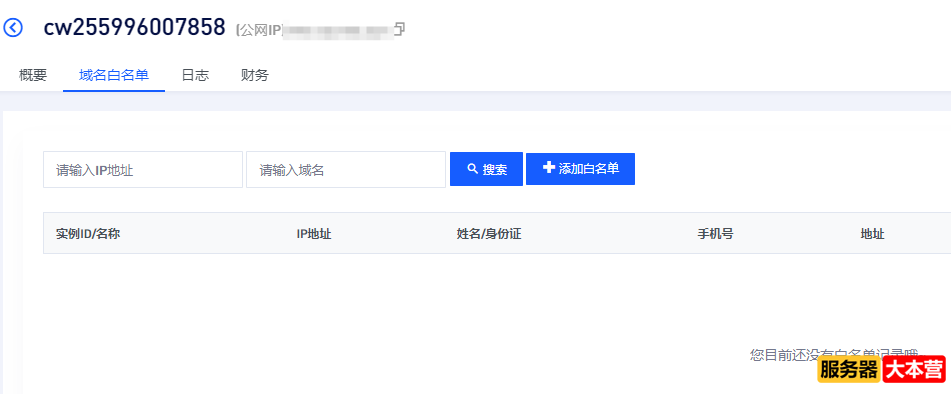
至此服务器创建全部完成
前端部署
web环境的部署
前端界面主要用于管理服务器和与用户交互使用,需要使用到Web服务器,这里我们使用宝塔快速部署环境。
宝塔Linux面板是提升运维效率的服务器管理软件,支持一键LAMP/LNMP/集群/监控/网站/FTP/数据库/JAVA等100多项服务器管理功能。
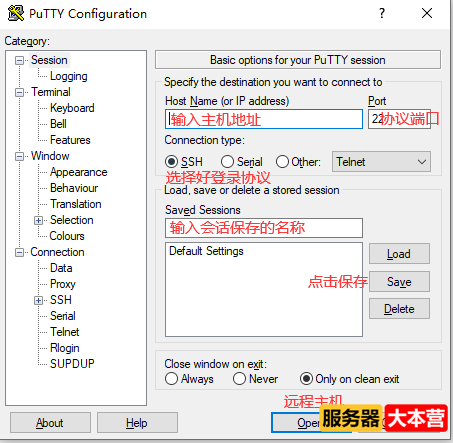
使用堡塔/PuTTY远程连接Linux服务器,如下图,主机填入实例IP,SSH端口默认22,确认后open连接。
CentOS7系统下搭建pterodactyl翼龙游戏面板详细教程
CentOS7系统下搭建pterodactyl翼龙游戏面板详细教程
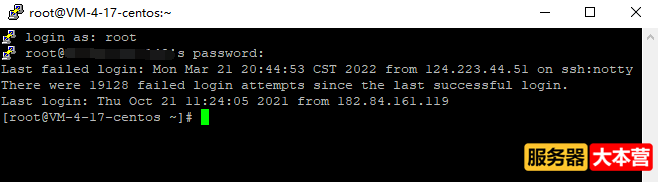
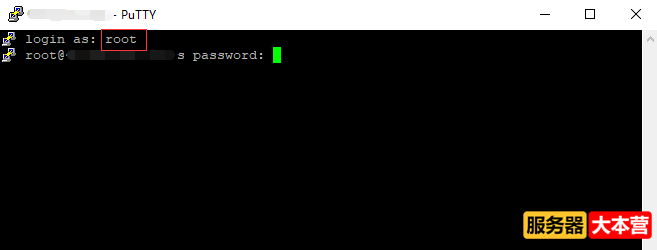
如下图所示输入用户名:root,回车,根据提示输入密码,输入密码时密码是不会显示在屏幕上的,输入完成后回车即可。
CentOS7系统下搭建pterodactyl翼龙游戏面板详细教程
登录成功后提权到管理员,安装基础软件
- [root@pterodactyl ~]# sudo -i
- [root@pterodactyl ~]# yum -y install bash-completion tmux epel-release
安装完成后使用tmux新开一个窗口,防止安装过程中中断导致程序退出。
- [root@pterodactyl ~]# tmux
输入宝塔安装命令,开始安装宝塔
- [root@pterodactyl ~]# yum install -y wget && wget -O install.sh http://download.bt.cn/install/install_6.0.sh && sh install.sh
安装完成,将会显示面板地址、账号密码,自己保存一下,后面会用到,然后我们关闭防火墙
CentOS7系统下搭建pterodactyl翼龙游戏面板详细教程
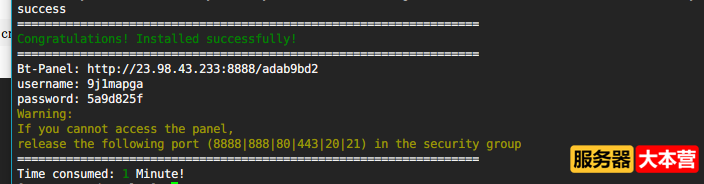
- [root@pterodactyl ~]# systemctl disable --now firewalld.service
- Removed symlink /etc/systemd/system/multi-user.target.wants/firewalld.service.
- Removed symlink /etc/systemd/system/dbus-org.fedoraproject.FirewallD1.service.
首次登录需要同意用户协议
CentOS7系统下搭建pterodactyl翼龙游戏面板详细教程
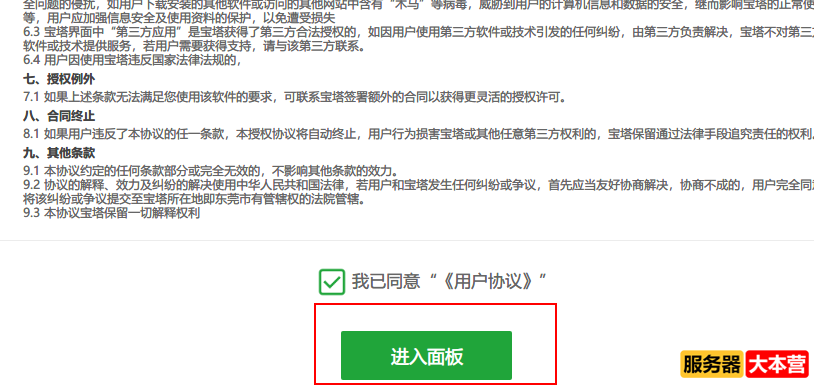
进入面板后会弹出安装套件弹窗,请选择下面的版本,然后点击一键安装,等待安装完成,大概需要3-5分钟。
CentOS7系统下搭建pterodactyl翼龙游戏面板详细教程
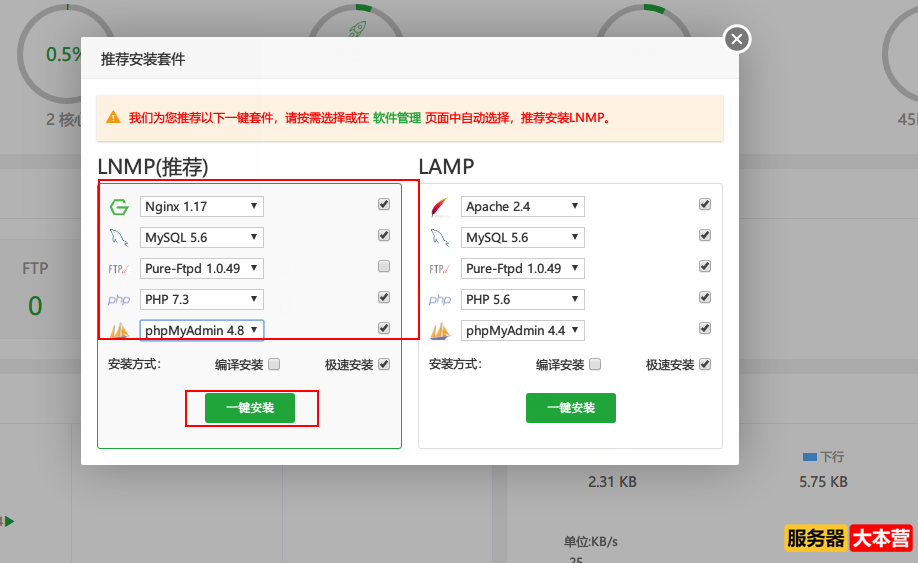
CentOS7系统下搭建pterodactyl翼龙游戏面板详细教程
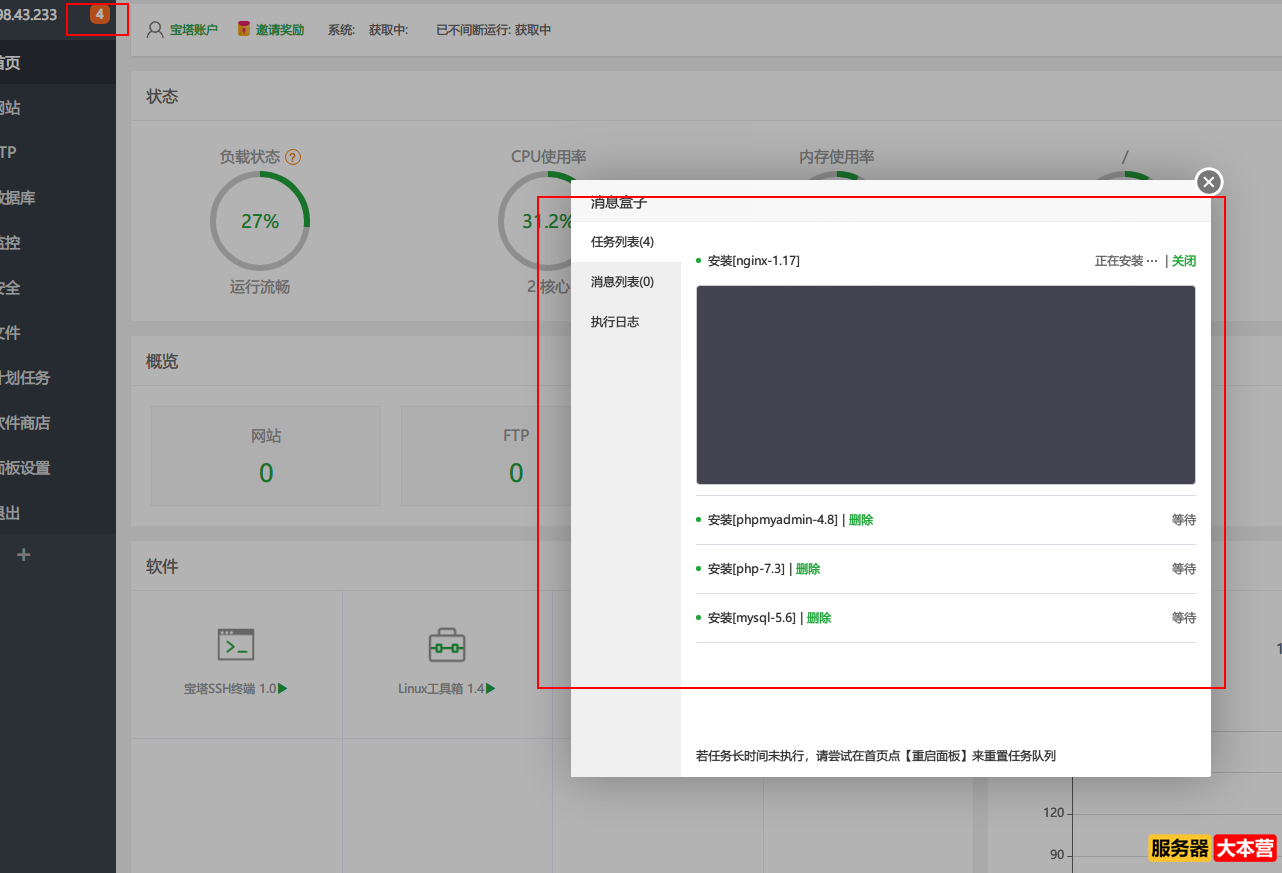
进入宝塔侧边栏软件商店,点击php设置,修改配置
CentOS7系统下搭建pterodactyl翼龙游戏面板详细教程
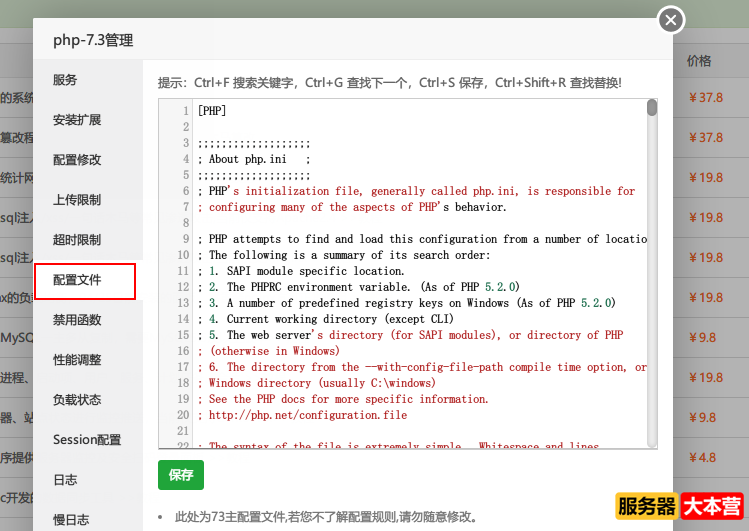
搜索disable_function,清空被禁用的函数
CentOS7系统下搭建pterodactyl翼龙游戏面板详细教程

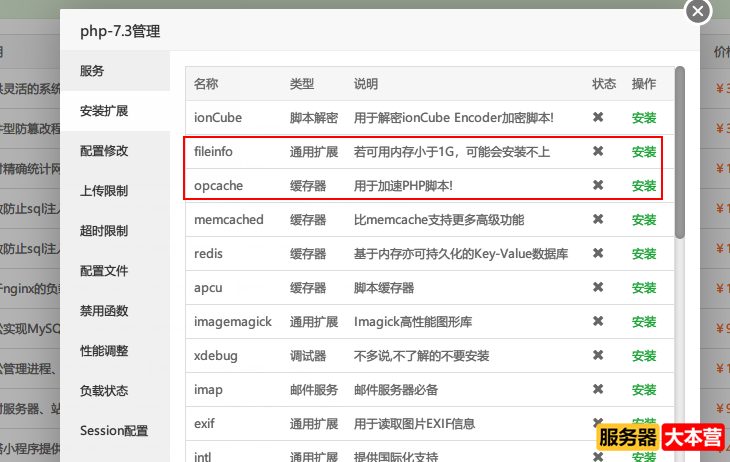
进入安装扩展,安装fileinfo和opcache扩展
CentOS7系统下搭建pterodactyl翼龙游戏面板详细教程
点击网站,创建一个站点,域名需要自己解析
面板程序的安装
使用SSH,进入网站根目录,开始安装前端。
- cd /www/wwwroot/panel/
- # 下载前端文件并解压
- curl -Lo panel.tar.gz https://github.com/pterodactyl/panel/releases/download/v0.7.16/panel.tar.gz
- tar --strip-components=1 -xzvf panel.tar.gz
- chmod -R 755 storage/* bootstrap/cache/
安装composer扩展,然后生成站点key
- composer install --no-dev --optimize-autoloader
- # Only run the command below if you are installing this Panel for
- # the first time and do not have any Pterodactyl Panel data in the database.
- php artisan key:generate --force
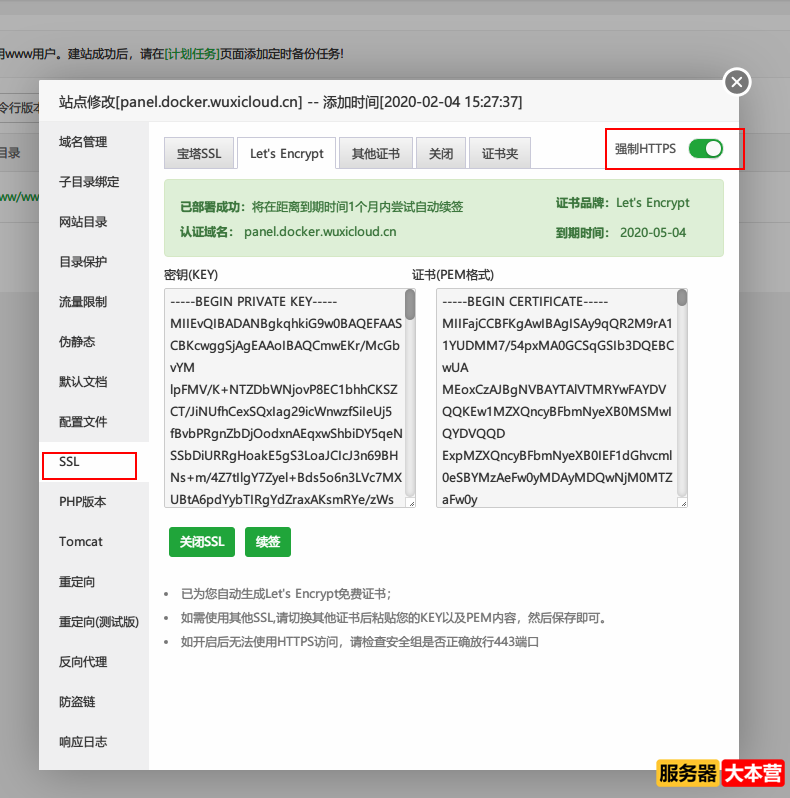
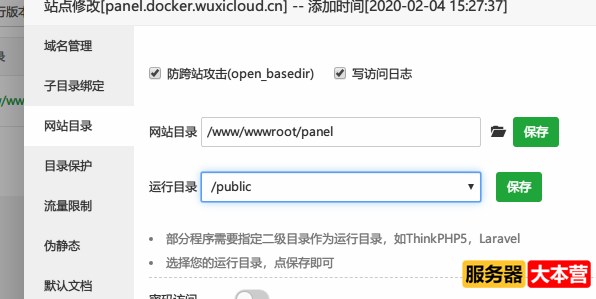
进入宝塔面板-站点设置,开始配置SSL和运行目录
CentOS7系统下搭建pterodactyl翼龙游戏面板详细教程
CentOS7系统下搭建pterodactyl翼龙游戏面板详细教程
CentOS7系统下搭建pterodactyl翼龙游戏面板详细教程
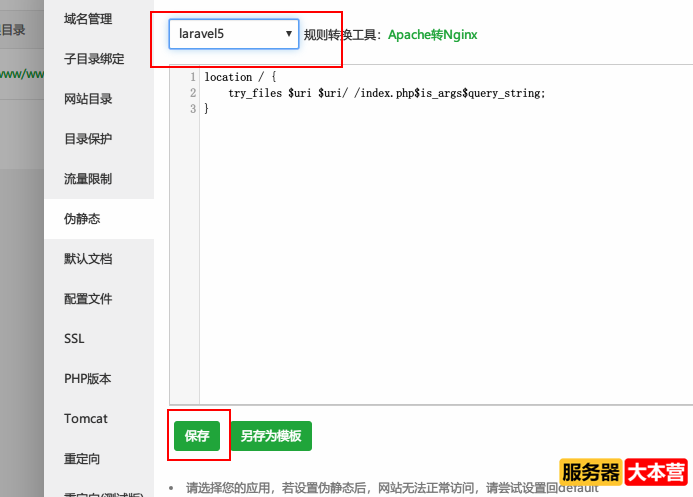
设置完成后,返回SSH,开始进一步配置
- [root@pterodactyl panel]# php artisan p:environment:setup
- // 从面板导出的egg的作者邮箱,这里选择默认,直接回车即可
- Egg Author Email [unknown@unknown.com]:
- >
- // 这里填写面板的URL,发邮件时会用到,请务必加上https://或http://
- Application URL [http://localhost]:
- > https://panel.docker.wuxicloud.cn
- // 这里填写使用的时区,直接填写Asia/Shanghai,代表中国时区
- Application Timezone [America/New_York]:
- > Asia/Shanghai
- // 缓存驱动,选择默认
- Cache Driver [Filesystem]:
- [redis ] Redis (recommended)
- [memcached] Memcached
- [file ] Filesystem
- >
- // Session驱动,选择默认
- Session Driver [MySQL Database]:
- [redis ] Redis (recommended)
- [memcached] Memcached
- [database ] MySQL Database
- [file ] Filesystem
- [cookie ] Cookie
- >
- // 队列驱动,选择默认
- Queue Driver [MySQL Database]:
- [redis ] Redis (recommended)
- [database] MySQL Database
- [sync ] Sync
- >
- // 是否开启基于UI的配置编辑器,选择默认
- Enable UI based settings editor? (yes/no) [yes]:
- >
- [root@pterodactyl panel]# php artisan p:environment:database
- // MYSQL数据库IP地址,选择默认
- Database Host [127.0.0.1]:
- >
- // MYSQL数据库端口,选择默认
- Database Port [3306]:
- >
- // 数据库名称,输入创建站点时的数据库名称
- Database Name [panel]:
- > panel_docker_wux
- // 数据库用户名,输入创建站点时的数据库用户名,一般与名称一致
- Database Username [pterodactyl]:
- > panel_docker_wux
- //数据库密码,输入创建站点时的数据库的密码,这里输入密码不会有任何显示
- Database Password:
- >
配置完成后,可选配置发信,如果有SMTP服务器,可以在这里配置
- php artisan p:environment:mail
接着开始安装数据表,输入以下命令
- php artisan migrate --seed
- // 提示到这个地方需要输入yes然后回车
- Do you really wish to run this command? (yes/no) [no]:
- > yes
安装完成后,开始创建初始用户
- [root@pterodactyl panel]# php artisan p:user:make
- // 用户是否为管理员,选择yes
- Is this user an administrator? (yes/no) [no]:
- > yes
- // 用户邮箱地址,自行输入
- Email Address:
- >
- // 用户名
- Username:
- > admin
- // 姓
- First Name:
- >
- // 名
- Last Name:
- >
- // 用户密码,需要至少8位
- Password:
- >
然后为整个站点设置所有者
- [root@pterodactyl panel]# chown -R www:www ./*
设置完成后,编辑.env文件,加上一句,关闭谷歌验证,否则国内无法登录面板
任务和服务的添加
接着开始添加cron任务
- [root@pterodactyl panel]# crontab -e
- # 加入一行
- * * * * * php /www/wwwroot/panel/artisan schedule:run >> /dev/null 2>&1
cron任务添加完成后,需要创建服务,以支持队列功能。
- vim /etc/systemd/system/pteroq.service
- # Pterodactyl Queue Worker File
- # ----------------------------------
- [Unit]
- Description=Pterodactyl Queue Worker
- [Service]
- # On some systems the user and group might be different.
- # Some systems use `apache` or `nginx` as the user and group.
- User=www
- Group=www
- Restart=always
- ExecStart=/usr/bin/php /www/wwwroot/panel/artisan queue:work --queue=high,standard,low --sleep=3 --tries=3
- [Install]
- WantedBy=multi-user.target
创建完成后,设置开机启动并且启动服务
- [root@pterodactyl panel]# systemctl enable --now pteroq.service
- Created symlink from /etc/systemd/system/multi-user.target.wants/pteroq.service to /etc/systemd/system/pteroq.service.
后端部署
前端部署完成后,我们将在这台服务器上继续安装,部署后端,以实现对接。
docker的安装
需要确定的是,容器架构是无法安装docker的,所以你需要一台kvm或者类似虚拟化的服务器来安装docker。
进入用户目录,输入命令一键安装docker,整个过程需要1-2分钟
- [root@pterodactyl ~]# cd ~
- [root@pterodactyl ~]# curl -sSL https://get.docker.com/ | CHANNEL=stable bash
安装完成后我们需要启动docker服务
- systemctl enable --now docker.service
nodejs的安装
这里使用nodejs脚本,安装nodejs源,注意nodejs版本需要10
https://github.com/nodesource/distributions/blob/master/README.md
- curl -sL https://rpm.nodesource.com/setup_10.x | bash -
- yum -y install nodejs
后端的安装
首先创建目录,用于存放程序和服务器数据,创建后进入daemon目录,开始安装后端 �
- mkdir -p /srv/daemon /srv/daemon-data
- cd /srv/daemon
- # 一键下载代码并解压
- curl -L https://github.com/pterodactyl/daemon/releases/download/v0.6.12/daemon.tar.gz | tar --strip-components=1 -xzv
- # 安装npm包
- npm install --only=production --unsafe-perm
前后端的对接
进入后台,点击右上角设置图标,进去管理员面板
CentOS7系统下搭建pterodactyl翼龙游戏面板详细教程
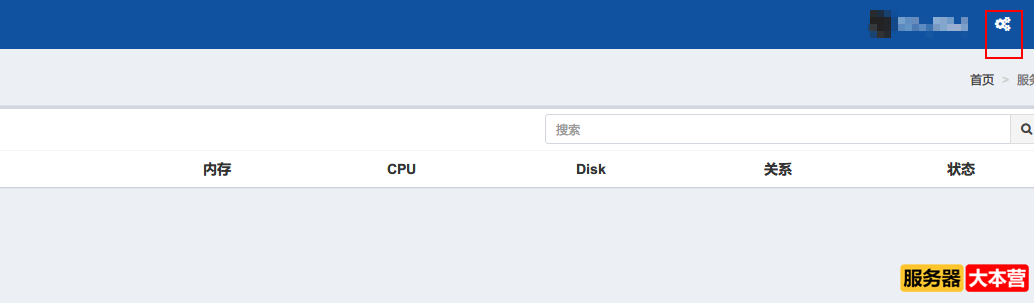
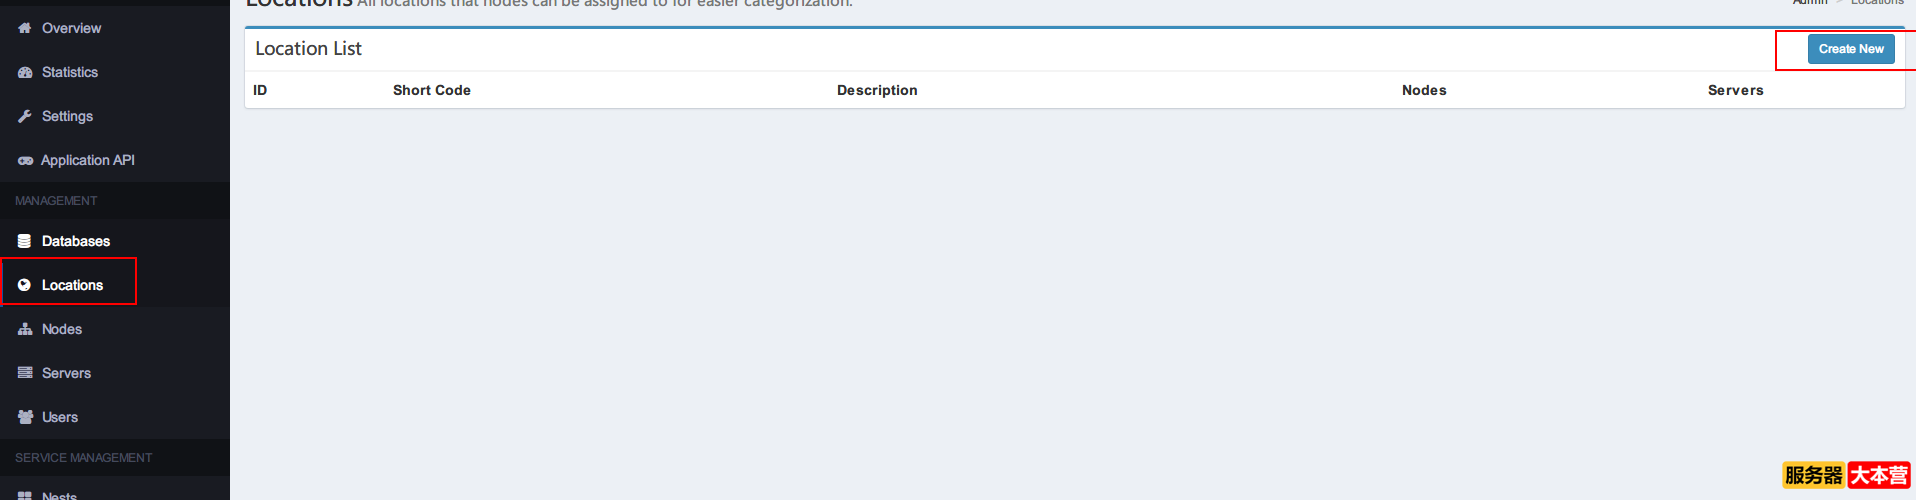
点击locations,创建一个区域
CentOS7系统下搭建pterodactyl翼龙游戏面板详细教程
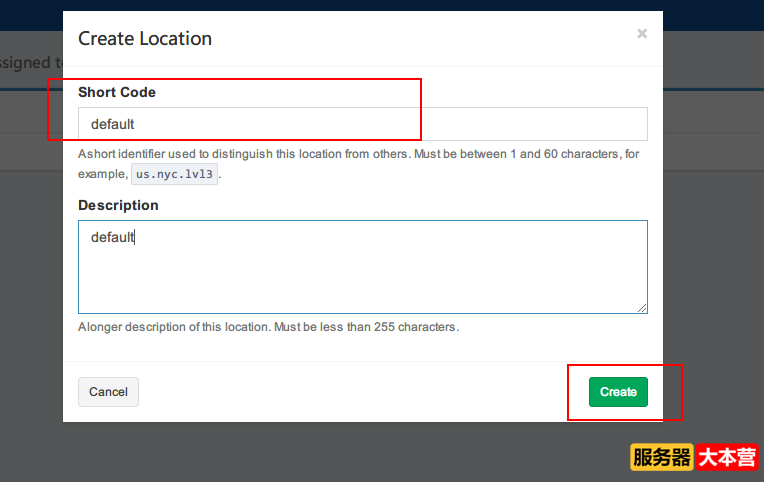
填入短码和说明,然后创建,短码用于识别区域
CentOS7系统下搭建pterodactyl翼龙游戏面板详细教程
创建完成后,选择左侧的nodes,开始创建节点
CentOS7系统下搭建pterodactyl翼龙游戏面板详细教程
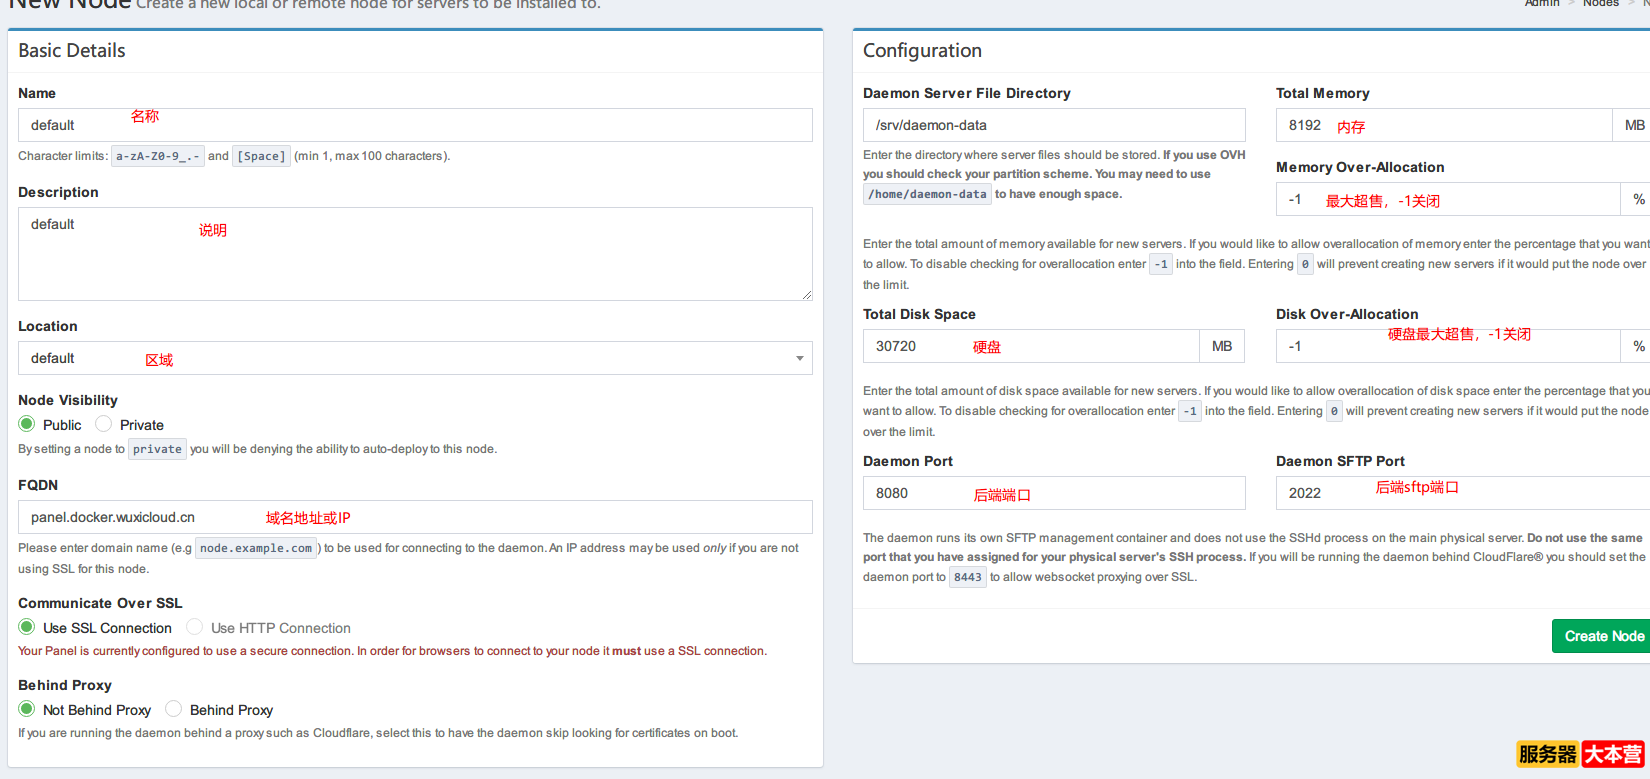
填写完成后,点击create,接着点击生成token,一键部署配置
CentOS7系统下搭建pterodactyl翼龙游戏面板详细教程
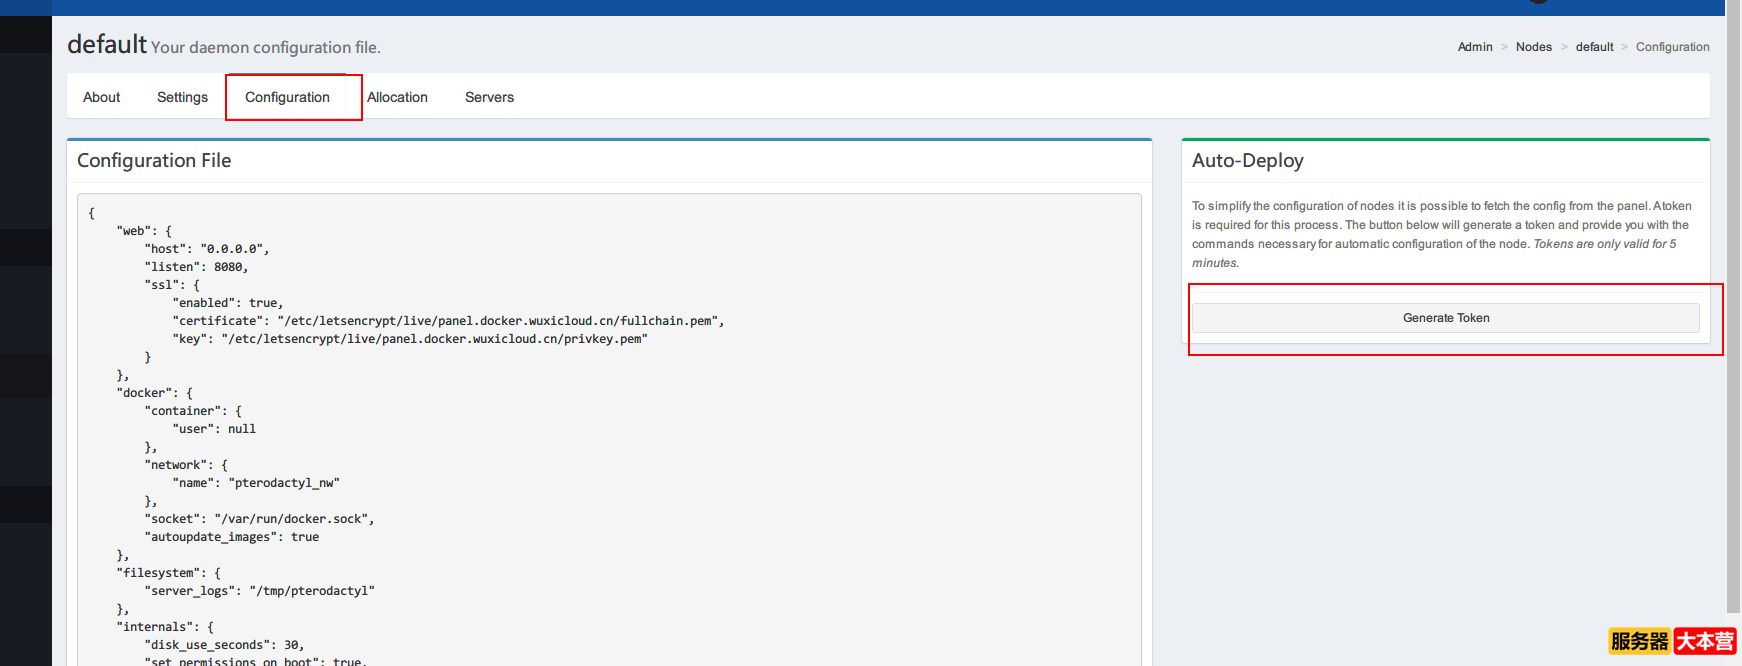
把获得的命令复制到服务器中执行,程序将自动配置
CentOS7系统下搭建pterodactyl翼龙游戏面板详细教程
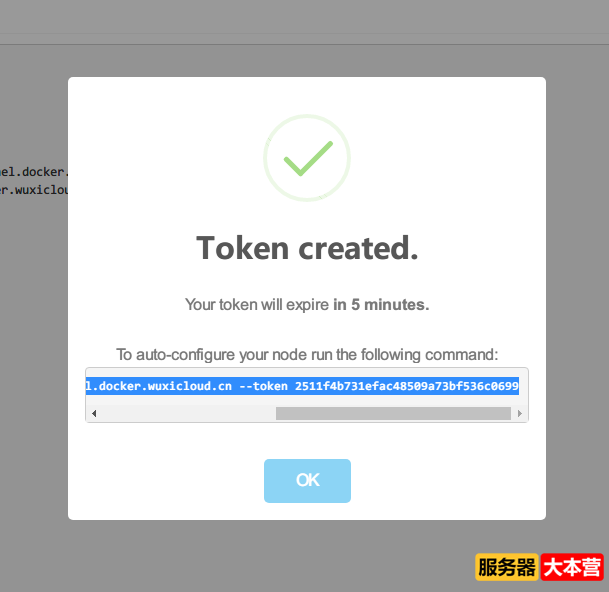
部署完成后,编辑配置,修改证书地址
- [root@pterodactyl daemon]# vim config/core.json
- "certificate": "/etc/letsencrypt/live/panel.docker.wuxicloud.cn/fullchain.pem",
- "key": "/etc/letsencrypt/live/panel.docker.wuxicloud.cn/privkey.pem"
- #将其修改为宝塔中的地址
- "enabled": true,
- "certificate": "/www/server/panel/vhost/cert/panel.docker.wuxicloud.cn/fullchain.pem",
- "key": "/www/server/panel/vhost/cert/panel.docker.wuxicloud.cn/privkey.pem"
- }
修改完成,手动启动后端测试
- [root@pterodactyl daemon]# npm start
- > pteronode@0.6.12 start /srv/daemon
- > node src/index.js | node_modules/bunyan/bin/bunyan -o short
- 08:28:55.414Z INFO wings: + ------------------------------------ +
- 08:28:55.416Z INFO wings: | Running Pterodactyl Daemon v0.6.12 |
- 08:28:55.417Z INFO wings: | https://pterodactyl.io |
- 08:28:55.417Z INFO wings: | Copyright 2015 - 2019 Dane Everitt |
- 08:28:55.417Z INFO wings: + ------------------------------------ +
- 08:28:55.417Z INFO wings: Loading modules, this could take a few seconds.
- 08:28:55.835Z INFO wings: Modules loaded, starting Pterodactyl Daemon...
- 08:28:55.872Z INFO wings: Creating keypair to use for SFTP connections.
- 08:28:57.570Z INFO wings: Configuring user pterodactyl (id: 996) as the owner of all server files.
- 08:28:57.573Z INFO wings: Configuring timezone file location...
- 08:28:57.574Z INFO wings: Checking container networking environment...
- 08:28:57.584Z WARN wings: No isolated network interface for containers was detected, creating one now.
- 08:29:12.774Z INFO wings: Successfully created new network (pterodactyl_nw) on pterodactyl0 for isolated containers.
- 08:29:12.774Z INFO wings: Ensuring correct network interface for containers...
- 08:29:12.784Z INFO wings: Networking gateway detected as 172.18.0.1 for interface: pterodactyl0.
- 08:29:12.786Z INFO wings: Contacting panel to retrieve a list of currrent Eggs available to the node.
- 08:29:12.889Z INFO wings: Checking existing eggs against Panel response...
- 08:29:13.163Z INFO wings: Beginning server initialization process.
- 08:29:13.165Z INFO wings: Configuring websocket for daemon stats...
- 08:29:13.166Z INFO wings: Configuring internal SFTP server...
- 08:29:13.186Z INFO wings: Pterodactyl Daemon is up-to-date!
- 08:29:13.187Z INFO wings: Pterodactyl Daemon is now listening for secure connections on 0.0.0.0:8080
发现已经可以正常运行,接着我们创建服务,使其保持后台运行
- [root@pterodactyl daemon]# vim /etc/systemd/system/wings.service
- [Unit]
- Description=Pterodactyl Wings Daemon
- After=docker.service
- [Service]
- User=root
- #Group=some_group
- WorkingDirectory=/srv/daemon
- LimitNOFILE=4096
- PIDFile=/var/run/wings/daemon.pid
- ExecStart=/usr/bin/node /srv/daemon/src/index.js
- Restart=on-failure
- StartLimitInterval=600
- [Install]
- WantedBy=multi-user.target
接着启动服务,并配置开机启动
- [root@pterodactyl daemon]# systemctl enable --now wings.service
- Created symlink from /etc/systemd/system/multi-user.target.wants/wings.service to /etc/systemd/system/wings.service.
查看about页面,可以发现后端已经成功连上
CentOS7系统下搭建pterodactyl翼龙游戏面板详细教程
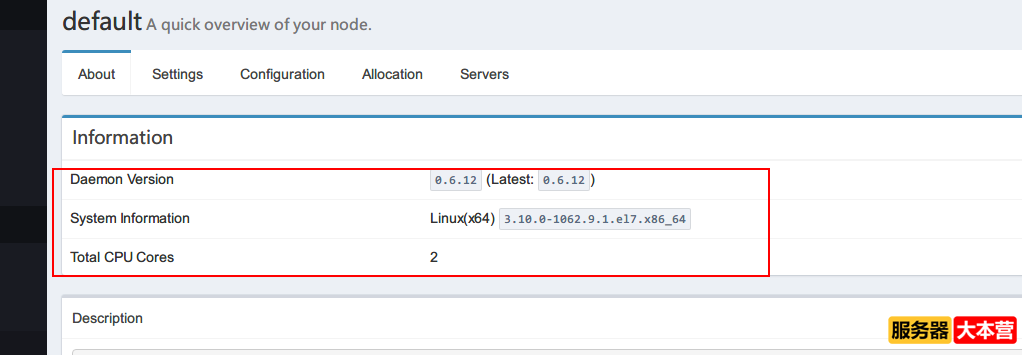
至此,后端部分已经安装完成,接着需要配置egg,创建服务器。
写在结尾
文章通过截图形式,基本说明了翼龙面板的前端后端搭建,以及前后端的对接,但深层次的一些命令仍然需要用户自己学习,这样才能做到解决问题和排错。
感谢您的阅读,服务器大本营-技术文章内容集合站,助您成为更专业的服务器管理员!
![点击直接加入[服务器大本营QQ频道]](https://www.fwqdby.com/data/attachment/common/cf/163843sqpktkbsqklllbt6.jpg)

 |Archiver|手机版|网站地图|服务器大本营
( 赣ICP备2021009089号 )
|Archiver|手机版|网站地图|服务器大本营
( 赣ICP备2021009089号 )


 发表于 2026-7-11 16:26:28

 置顶卡
置顶卡 变色卡
变色卡 千斤顶
千斤顶